harira and italian bean soup

DSC04152

Slowly simmering soups on the woodburner has become a regular evening pastime in our house lately. Harira and Italian bean soup, my two latest concoctions are very rustic, hearty affairs – the sort of soups that verge on a stew, can make a satisfying meal and change each time I make them. It all depends what leftovers I have in the fridge, what veggies the pigeons and pheasants have left me in the garden and what sort of mood I’m in for extra spice or more robust herbs.

DSC04155

With cold, grey days and lots of germs and flu bugs still lingering (some brought home from school for half term) both soups have felt comforting and warming. Packed with veggies and pulses, and making use of leftover meat bones, they feel both frugal and healthy too. I hadn’t realised quite how nutritious both soups might be until I read Alex’s great piece on her Cold Comfort Soup in Dale cottage diaries however. Apparently, slow cooking of bones in stocks and soups helps release lots of health-giving minerals. Alex’s chicken soup looks wonderful too.

My harira, a Moroccan style soup with lots of lentils made an extra meal out of a cheap but excellent cut of lamb which had already provided us with two tasty stews. I’d visited Liz Knight of Forage Fine Foods at her lovely, remote hillside cottage on the borders of Herefordshire and Wales and enjoyed the simple but delicious stew she made with lamb that had grazed the wild, herb covered pastures around her home. Inspired by the flavour of the meat and by Liz’s homemade rose el hanout (made with dried rose petals) which was wonderful scattered on the lamb, I couldn’t resist buying some lamb from her local shop to take home.

Wanting to do justice to this very free-roaming lamb, we enjoyed lots of it in a simple stew with root veg (which provided 2 family meals) then added the bone and some leftovers to a Harira cooked slowly on the woodburner that evening. The Harira recipe is adapted from a recipe in Casa Moro by Samuel and Samantha Clark, one of my favourite cookery books. The flatbread recipes in here go wonderfully with this soup too. As I was vegetarian for years, I used to make variations of this with veggie stock (obviously without the lamb) and with a few more lentils and it was very tasty. But this is the version I made this week:

Harira

2.75 litres cold water

Leftover lamb/bones (I had neck of lamb leftovers)

2 tablespoons olive oil

1 onion, finely chopped

3 garlic cloves, finely chopped

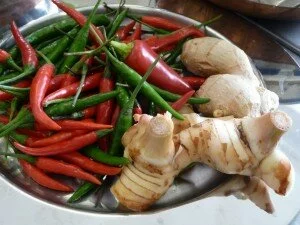
1 red chilli, de-seeded and chopped

a pinch of dried chilli flakes

1/2 teaspoon each of ground cinnamon, turmeric and ginger, cumin and coriander (vary according to personal preference)

1 large bunch fresh coriander, stalks and leaves separated, washed and chopped

100g green or brown lentils

120g red lentils

1 400g tin of tomatoes

200g chard/spinach/kale/cavolo nero (depending what available/in season)

a squeeze of lemon

sea salt and black pepper

Heat the olive oil in a large saucepan, cook the onions slowly for 5 mins, then add garlic and spices and the coriander stalks, cook for another couple of minutes. Add the water and lamb, bring to simmer and cook slowly for 1/2 hour (if the lamb is raw, cook for another 1/2 hour). Add the lentils and simmer for another 1/2 hour. Add the tomatoes, cook for another 10 minutes then add the chopped chard and simmer for another 5 minutes. Season with salt, pepper, coriander leaves and lemon juice and continue to cook for another 10 minutes until the pulses are soft. Remove lamb bone, flaking off any meat into the soup, check seasoning and serve.

In between making the Harira and Italian Bean soup, I read some really interesting, thought provoking pieces about our consumption of meat. After the (surely not too surprising) recent discoveries of what some of the mass-produced processed meat products on sale actually contain, there are some really good points being made.

In her great post on ‘Meat Choices’ on her blog, Sally Prosser says:

” The industrialisation of farming in agriculture and animals (including the failed promises and potential catastrophe of GM crops) and the pervasive spread of increasingly processed foods in the hands of fewer and more powerful corporations and retailers is one of the most sinister threats of our age. So what can we do?”

In my opinion, one of the things that we can do, is go back to using well-reared meat sparingly, something that to pre-war generations was a way of life. Cheap cuts of well-reared meat can be easily (and deliciously) padded out with pulses to make so many tasty, healthy and frugal meals. And I agree with Trine Hahnemann’s ideas in The Nordic Diet about eating wild or free-range meat a couple of times a week then eating several fish and veggie meals. Surely this is good for our health as well as our environment?

Alex Stevenson in her Notes on a Scandal piece on her blog, says:

“To me, and many other smallholders, food is the key reason for taking up such a lifestyle, to know what we are eating, what’s in it and how it is produced. This is an aspect of food consumption which as a society, we are getting further and further away from.”

Similarly, I know that I’m lucky to live in a rural area where it’s easy to buy good meat – and to have raised our own rare breed pigs last year. I feel fortunate to have the space to enjoy growing veggies too. And I know that our society has complex problems to resolve associated with food production, to which there aren’t easy answers.

 102_0854DSC03217

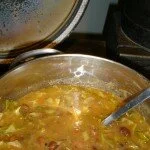
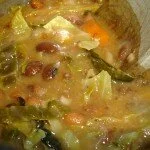
Making soup may not be the answer to all our meat issues, but slow cooking a handful of beans or pulses with vegetables and good stock is a satisfying activity for a cold February evening! I had a ham bone in the freezer from a home-cured joint I cooked last time my family came to visit. This is the Italian peasant style soup I made from it. It makes enough for several suppers.

Italian Bean Soup

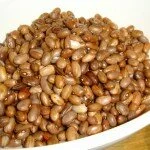
450g dried borlotti beans (you could use 2 tins of cannellini or borlotti beans instead) soaked overnight, then boiled for 15 mins and washed

7 tablespoons extra virgin olive oil
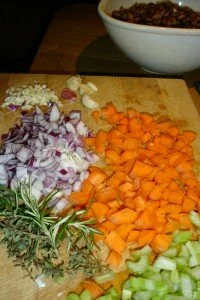
5 garlic cloves

2 onions, finely chopped

2 carrots, finely chopped

1 leek, chopped

2 sticks celery, finely chopped

1/2 tin tomatoes

1 ham bone (if you don’t have a ham bone, I’ve made a veggie version with leftover parnesan rinds added for extra savoury flavour)

1.5 litres water

300g cabbage leaves (cavolo nero is perfect, but I used January King cabbage this time)

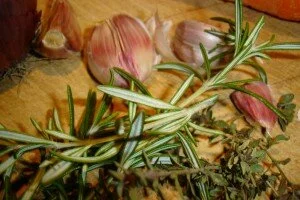
1 sprig rosemary and a few sprigs of thyme

slices of bread to serve, ideally sourdough or ciabatta style

DSC04151DSC04150

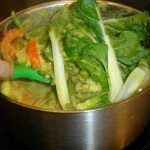
Heat 3 tablespoons oil, chop two of garlic cloves and cook with onions and leeks slowly for 5 minutes, without colouring. Add the remaining vegetables, sweat for a few minutes then add the ham bone, beans and water. Cover, bring to boil and simmer for about 1 hour until beans are tender. Remove the ham bone and puree some of the soup with a handheld blender. I like some texture, so remove half the beans/veg and puree what’s left in the pan – but you can liquidise more if you want a thick soup. Add beans/veg back to liquidised soup along with cabbage and simmer gently 10 minutes until cabbage tender.

DSC04167DSC04158

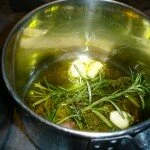
While the cabbage is cooking, pour remaining oil into a small saucepan and heat it gently with the rosemary, thyme and 2 of the remaining garlic cloves (brusised but unpeeled). After about 10 minutes, strain the now flavoured oil into the soup and heat it through for a few minutes, stirring and season with salt and pepper to taste. Toast bread and rub with remaining garlic clove, placing in the bottom of soup bowl before ladling over the soup – it will soak up all the lovely flavours. Great with parmesan too.

DSC04174DSC04179

The soup will keep well for a few days in the fridge, in fact its flavour improves the day after it’s made.

And sorry, we ate all the harira before I remembered that I hadn’t taken any pics!

sew simple – product review


DSC04129

When I was asked if I’d like to review a fabric glue called ‘sew simple’ that “will help you make permanent repairs , additions and alterations to clothing, curtains and covers – without sewing,” there were two attractions:

1) My 5 year old had brought home her muddy forest school kit and P.E. kit for half term and I knew that I should make a better attempt at labelling them. Too many gloves and hats were ending up in the black hole of the school cloakroom. I had some sew-in name labels but had tried the lazier option of a marker pen, which had inevitably faded.

2) I love the ‘make do and mend’ philosophy, hate waste and throwing things out just because of a minor tear. But I’m pretty hopeless at sewing.

DSC04132

So I decided to try this ‘Glu & Fix’ product from Bostik on name labels first of all. The tube of glue has an easy to use screw on spreader nozzle so even I couldn’t be too messy in applying it.  After spreading, you have to wait a minute, then press the two surfaces together and allow to dry before rough handling.

DSC04128DSC04131DSC04130

I glued name labels onto a sweatshirt, jogging bottoms, waterproof dungarees, a t-shirt, tights and inside wellies in this way. It seemed dry within a few minutes. Having forgotten about the pile of clothes for a few hours, I then put everything except the wellies into the washing machine and washed them at a regular 40C wash. They seem well attached, were fine after ironing and my daughter gave her sports kit some testing out yesterday as her first day back at school was ‘Sporty day’. She came home in them, and again, they seem pretty secure.

The instructions point out on the sew simple packet that this glue product doesn’t work on 100% nylon or polyester fabrics and “It may damage some delicate fabrics – test on a small area first.” The school uniform items I used included some with a polyester mix and they seem fine. As for mending delicate fabrics, I fear my clumsiness may cause more damage than the glue! But for the more adept, sew simple could be worth trying on trickier mends.

According to the packaging, sew simple is “perfect for hems, turn-ups, labels, badges and patches.” I’ll definitely be trying it on lttle tears and rips on clothes from racing around in the playground or garden. From my experience so far, it seems a very quick and effortless way of mending – which if like me, you’re not exactly a seamstress, has to be a good thing.

Many thanks to Bostik for sending me Sew Simple to review.


making nam prik phao & pad thai – cookery school review

P1030947

Having enjoyed Demuth’s imaginative ways with veggies at the Bath restaurant, I was very excited to be invited to their vegetarian cookery school. As I’m partial to using my home-grown ingredients in a bit of culinary globe-trotting,  courses such as Flavours of the Middle East, Flavours of Italy, Moroccan and A Taste of Spring in Pakistan immediately appealed. A very tricky decision, but I opted for the Taste of Thailand course.

I love Thai food, all those fragrant herbs and addictive blend of salty, sour, sweet and bitter flavours. And living in a rural area, without good takeaways within delivery range, the easiest option is often to cook my own.

Walking up the steps of the lovely Georgian building that houses the cookery school, the fragrant aroma of thai ingredients was enticing. After being greeted with coffee and delicious home-made biscuits, we were introduced to the ingredients by Rachel Demuth.  

P1090312

“One of the most important parts of cooking is tasting, ” Rachel explained. Music to me ears! Especially as the tasting included Tom Yam Soup, Thai Spring Rolls, Pad Thai, a deliciously refreshing yet spicy Green Papaya Salad and a black Rice pudding, sweetened with palm sugar and eaten with Mango slices which were caramelised with palm sugar, lime juice and chilli. All dishes we learnt to cook, along with wonderfully tasty Peanut and Nam Prik Phao dipping sauces and Thai Red Curry.

But the tasting started off very simply. Rachel and Helen Lawrence (previously chef at Demuths for 5 years) talked us through a selection of Thai ingredients, from galangal to tamarind and palm sugar. Just the look of the ingredients, spread across the table, was wonderful. Many of them were familiar but I’d never seen turmeric (a rhizome that is then normally dried and crushed and used in food) in its fresh form. We learnt that in addition to flavouring dishes such as pad thai, turmeric has healing qualities and can be rubbed fresh onto a wound.

P1090320 P1090322

Taking the time to pass around these ingredients, smelling them and nibbling little pieces was fascinating. As I grow lots of coriander, I often used the stalks as well as the leaves, but I hadn’t realised that the roots have a citrus flavour. Or that galangal smells and tastes quite so different from ginger: it has a subtle perfumed smell and more fragrant flavour.

It made me think of my shoddy tendency to often substitute ingredients in an exotic recipe for whatever I have to hand; using lemon balm instead of lemongrass in my butternut squash noodles and replacing galangal with ginger or palm sugar with caster sugar, are all recipe deviations I’m guilty of.

Tasting and noticing the difference in flavour that using the right ingredients gives to Thai dishes had me heading after the course to Banthon Oriental, a great thai grocers in Weston, Bath, to stock up cheaply on ingredients.

As a country bumpkin with a dearth of good oriental shops nearby, I was really excited about stocking up, especially after learning about the keeping qualities of the following ingredients:

– Palm sugar. Different variations from light, to a dark version that adds a mollasses flavour to dishes. Keeps for ages in the cupboard, you can just grate it when needed.

– Galangal. Quite different in flavour from ginger and freezes well.

– Lemongrass. Worth buying just for the wonderful fragrant smell, and freezes well.

– Lime leaves. Very pungent and freeze well but just make sure they’re in an airtight container otherwise everything else in the freezer will smell of lime!

– Spring roll pastry wrappers. You can buy from a Thai grocers and freeze.

P1030948

The course was a really enjoyable mix of learning new skills, watching demonstrations and relaxing with incredibly tasty food. A clumsy, rustic sort of cook, I would never have attempted making Thai spring rolls without following Helen’s easy face to face instructions. And although I love experimenting with many types of cooking, I normally follow recipes for precise quantities of lime juice, chilli etc with Thai food. Yet being encouraged to keep tasting before deciding if we needed more sweet (palm sugar) hot (chilli) salty (soya sauce) sour (tamarind or lime juice) in our Pad Thai noodles or Nam Prik Phao dipping sauce has made me feel a bit more confident about creating my own variations of thai dishes.

Nam Prik, by the way, is chilli water and Phao means roasted. Chillies, galic, shallots and tomato sauce are roasted until softened (shrimps would be added if this wasn’t a vegetarian version) and then pounded in a pestle and mortar with tamarind water, lime juice, shoyu and palm sugar to taste. We used ours in Tom Yam soup and also as a wonderful dipping sauce for spring rolls.

P1090341

Sipping prosecco with a taste of black rice pudding and sitting down at the end to relax and savour the Thai Red Curry and Green Papaya Salad we’d made with organic wines and juices, made the day feel like a lovely, decadent treat. As did enjoying the views of Bath Abbey and the light flooding in through the huge Georgian windows of the cookery school with its location in the centre of Bath.

P1090348

DSC04120DSC04122DSC04123

It’s definitely concentrated my mind on the importance of the right ingredients. I’m now keen to try out the recipes I’ve learnt for spring rolls, red thai curry and pad thai, adding different mixes of home-grown veggies, but using authentic thai ingredients for that distinctive flavour.

My planting for the year has been influenced by the course too. I’m keen to grow lots of thai basil; it grows easily in our climate and has a wonderful flavour and smell. Plenty of coriander planted little and often – it goes to seed easily so I’ll try to stick to my usual pattern of planting it in a sunny spot early in the year then adding lots of successive sowings in partial shade for the heat (I’m optimistic!) of summer. More Joy Larkcom influenced oriental veggies would be good too.

And I was very excited to hear that Green Papaya salad can be used with unripe squash. Being realistic about an English summer, I often end up with squash that haven’t had enough sun to ripen them before the frosts start; this will be a great use for them.

P1090346

Having learnt that Thai cuisine is an amalgamation of many influences, Chinese Malay and Indian, it’s great to see that it’s still possible to add a Cotswold influence. And although I’m going to try to keep a stock of lemongrass, galangal and lime leaves in the freezer, I’m delighted to see that there’s still scope for some improvisation with home-grown/local ingredients in my kitchen. After all, the cookery school explained that Thai (which means free) are never rigid in their approach to cooking but will use the best freshest available ingredients.

With many thanks for a lovely day to Demuths vegetarian cookery school.

To learn how to cook Rachel Demuth’s version of the wonderful streetfood dish, Pad Thai, which we cooked for brunch at the cookery school, click here.


Posted in eat, edible garden, reviews | Tagged , black rice pudding, Demuths vegetarian cookery school, Green Papaya Salad, growing coriander, Nam Prik Phao, Pad Thai, Thai food, Unripe Squash | 6 Replies

rhubarb custards

 DSC04073

The sun has been shining all weekend and with the snow gone, it’s not just mud that’s revealed. Crocus, cowslips and my Egyptian walking onions all lifted my spirits today. And Spring in the air has me dreaming of rhubarb.

My own rhubarb plants have some lovely rosy stems and acid green leaves, but they’re not ready for pulling yet. In the meantime there are those beautiful pink, tender stems of the forced variety in the greengrocers and farmshops. Much as I hate buying fruit that I grow, I can’t resist these and often end up biking back up the hill home with rhubarb poking precariously out of my rucksack.

The first recipe I can’t wait to make with rhubarb in February is rhubarb custards. So these have already been made and scoffed:

DSC04104DSC04070DSC04100

Recipe Rhubarb Custards

Enough for 6

300g rhubarb

3 tablespoons unrefined sugar + 80g (preferably vanilla sugar – i.e simply having spent some time in a jar with a vanilla pod)

300 ml double cream

200 ml full fat cream

8 egg yolks

Preheat oven to 190C. Chop the rhubarb into chunks and put into a baking dish with the 3 tablespoons sugar and a couple of tablespoons water, cover with foil and bake. Check after 45 mins to see if it’s tender. It may need a little longer – you want it to be soft to the touch but not mushy. You can simmer on a hob instead if you prefer in a saucepan, but I generally find it easier not to overcook and still have that lovely pink colour in the oven. Plus the woodburner is often still lit.

DSC04094

Turn the oven down to 140C when you’ve removed cooked rhubarb. Or if you’re using a woodburner oven like me, adjust the controls or open the door! Warm the cream and milk slowly in a small pan (with a vanilla pod if you wish if you aren’t using vanilla sugar) to just below boiling. Beat the egg yolks and remaining sugar in a bowl then whisk in the warmed milk/cream gradually.Divide the cooked rhubarb between 6 little ramekin dishes then pour over the custard. Stand these in a roasting tray and fill the roasting tray with water half-way up the ramekins. Bake in oven for about 25 minutes until the custard is set but still has a lovely wobble.


I often roast at least twice the amount of rhubarb I need for these custards as it’s great with granola and yoghurt in the morning. Karen at Lavender and Lovage’s Bread and Butter Pudding with rhubarb compote is another recipe that looks fab to try – any rich custardy combination is so fantastic in my view with the tartness of rhubarb. Which is why rhubarb ice-cream (made wiith a custard base) is wonderful too. But then simple rhubarb crumble is beckoning too. And rhubarb simply roasted with the juice of a seville orange left over from marmalade – with greek yoghurt or custard. Had better make sure I’m biking up the hill plenty of times with my ingredients. Otherwise something else will have a very custardy wobble.


lavender hearts

DSC04113

I gave Ruby a heart shaped lavender bag this morning. It was made from sari material I bought years ago in Kerala, filled with dried lavender, and hand-sewn by me in a truly appalling manner. When I attempted to make lavender bags last time and left one lying around, a visitor to our house saw it and said, “How lovely, did Ruby make it?”

Ruby was absolutely delighted with it.  Her reaction reminded me of how, tone deaf as I am, I enjoyed the brief time (when she was VERY little) and loved me singing to her. It didn’t last long. She looks at me in horror when I sing to babies or toddlers now.

I wonder how long it will be until she realises how rubbish I really am at sewing? Must enjoy her pleasure in the things I make her and make with her in the meantime!

Very keen to use the rest of the dried lavender in making lavender bath oil next week – it’s our half term.  And more lavender bags would actually be useful amongst our clothes as we do get lots of moths in our house.

If you want to know how to make lavender bags properly, SouleMama has some lovely ideas on how to make them with children, including using ink stamps on linen bags.

And Ruby decided on the fairy dress for her school Valentine’s disco this evening. Well, afternoon. Of course she is the only one with a social occasion to dress up for today. Although I’ve now been volunteered as a helper at the disco and there’s been talk of disco gear. Better clean up my best wellies.

making marmalade

DSC04047DSC04050

My daughter has a major dilemma this week. She has her first school disco and is wondering whether to wear her fairy outfit or flamenco dress. Meanwhile I’m wondering whether to make orange and flower water jam or pink grapefruit marmalade to add to my stash of seville marmalade. Sometimes I do wonder if we’re living in a surreal rural bubble.

But our hill is covered in snow again, the signs of energing life I was relishing are covered in a white blanket and I am back to woodburner worship. And making marmalade seems the right thing to do. Just as I love the comforting aroma of bread baking on a winter’s day, the citrus smells that fill the kitchen during a marmalade session make all that slicing of orange peel worthwhile. I love Diana Henry’s description in salt, sugar smoke (which has some lovely, unusual marmalade and orange jam recipes) of “vats of sunshine.” Besides, spreading my coarse (or messily) cut home-made marmalade onto thick slices of toast to go with a big mug of tea on a weekend morning is one of life’s simple pleasures.

This is the recipe I use every year for Seville Marmalade:

800g seville oranges

1.4 kg sugar

juice of 2 lemons

Put the oranges in a saucepan, fill with water to cover/so that they float freely, bring to boil and simmer for about 2 hours. A lovely citrus aroma will start to fill the kitchen. Take them out of pan, reserve the liquid, cut the oranges in half, scoop out the pips and put in a small pan. Chop up the oranges finely or coarsely, depending on personal preference (or patience and time!) and put them in large pan.

Ladle some of cooking water over pips in small pan and bring to boil. Boil for 5 mins, then strain through a sieve over chopped oranges in large pan. Add the lemon juice and stir in sugar. Bring to boil gently so that sugar dissolves before marmalade starts boiling, then boil until setting point is reached (I normally use a jam thermometer), about 15 mins. Ladle into sterilized jars (I normally wash then dry them in woodburner or use them straight from a hot cycle of the dishwasher) and seal.

DSC04052DSC04055DSC04056

While it’s hard to beat generously spreading sourdough toast with this marmalade, these are some of the other uses I have in mind:

– spread it onto Trine Hahnemann’s crispbread or shower buns to go with coffee

– make the marmalade muffins from I write this sitting in the kitchen sink (I love the title of this blog, taken from the opening line of the wonderful ‘I Capture the Castle.’

– try Hugh Fearnley Whittingstall’s Ham, Squash and Marmalade

– use Diana Henry’s idea in ‘Cook Simple’ to heat 175g marmalade with 4 tablespoons golden syrup, 50ml orange juice and juice of 1 lemon. Bring gently to boil, press marmalade with wooden spoon to break down and serve warm over chocolate and vanilla ice creams.

– make the lemon and marmalade cake from Belleau Kitchen

– bake Sally’s fruity breakfast loaf at mycustardpie

DSC04091DSC04048DSC04081